Hole by Hole
- Hole #1
- Hole #2
- Hole #3
- Hole #4
- Hole #5
- Hole #6
- Hole #7
- Hole #8
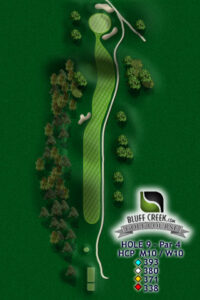
- Hole #9
- Hole #10
- Hole #11
- Hole #12
- Hole #13
- Hole #14
- Hole #15
- Hole #16
- Hole #17
- Hole #18
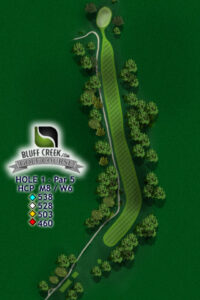
Our opening hole is a dogleg left with a few risk rewards.Play it safe and smart by hitting tee shot 180-200 yards to the middle of the fairway. This will leave a longer second shot – but its safe. A more aggresive play would be to move the ball from right to left or take a chance by going over the trees. To long or a bad line and you may find a very steep hill on the other side of the fairway. Your approach will be down hill (aim at the flag in the background) to a large green. – Good luck
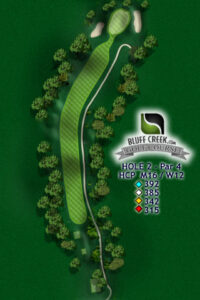
A dogleg to the right, this par 4 is not long, but has a tight driving lane between the trees. The large flat green is guarded by bunkers to the left and right.
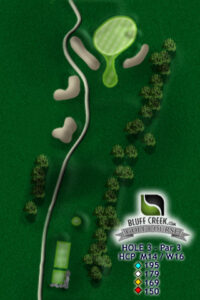
This par 3 is moderatein length. Pin locations can be difficult when they are located on the right side of the green. Par is a great score here.
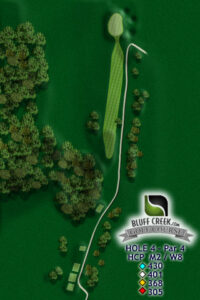
This hole is one of our toughest par 4’s. The trees on the left stick out and tend to force your shot right. Wildgrass areas to the right gobble up stray tee shots. You can avoid this by hitting over the trees or play the ball from right to left. The greens shape makes it hard to land the ball on the green and make it stick, so it may be best to land it before the green and let it run up onto the green. There is trouble behind the green.
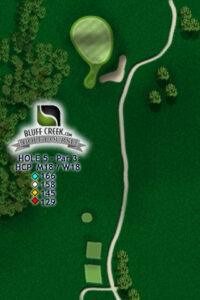
An elevated tee on this par 3 makes this hole look easier than it is. Club selection is key here. You will want to stay below the hole. This green has seen more 3 putts than 1 putts.
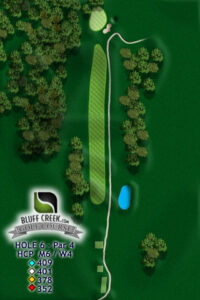
Another difficult par 4. There is penalty area the left and trees to your right. However, the fairway is wide and forgiving. The approach to the green needs to be accurate. Miss a little to the left and you’re in the penalty area Miss to the right, and you’re in the bunker. Local knowledge on this green has its advantages. What you see is sometimes not what you get.
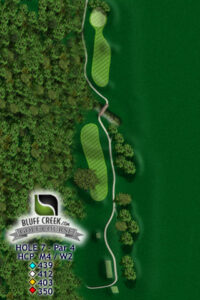
Decisions, Decisions Decisions – Play it safe and short or go for it! Your tee shot will determine what your choices will be on this hole. Large trees are just to the right of the landing zone. and a ravine runs across the fairway 150 yards from the green. Hit too far left and you’re looking at a wall of trees to hit over to a green you can’t see. The green is easily approachable with a good drive, just don’t miss left. Par on this hole is a great score!!
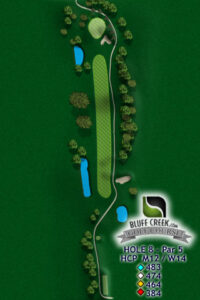
One of our par 5’s where an eagle is not out of the question. A great hole especially during tournament play. Accuracy off of the tee is critical to avoid the water and OB on the left and trees to the right The green is large with a deep green side bunker on the right side waiting to collect any poor shots. This is a hole you can “get one back” after 2 challenging par 4’s.
Final hole going “out”. This par 4 has some bunkers that could give you trouble. First, The fairway bunker is well-positioned and can be reached on the tee shot. Second, the bunker near the green covers most of the green, Red pins are tough to get close. OB the entire left side of this hole and a small pond about 250 yards off the tee to the right makes accuracy over distance a priority.
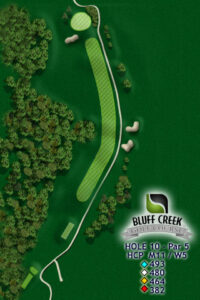
The first “in” hole is the first of 3 par 5;s on the back. #10 is a par 5 that doglegs slightly to the left. Try and get your drive to the right of the ravine or just beyond to give yourself a chance of hitting the green on your next shot.

#11 is the first of three par 3’s on the back. The Bluffs wrap around the left and back of the green right, A shot just a little off the mark can find itself at the bottom of the ravine. Hit too short, and you could be stuck in the turf hollow in front of the green. Coming soon will be a new larger hour glass green – approximate green opening Fall 2021.
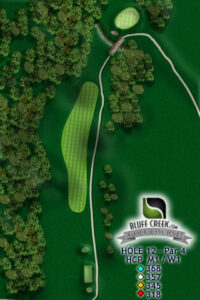
Perhaps our toughest hole on the course. Ideally you want to hit the drive to the 150 yard marker of just left of it. This will leave you with a good approach to a green that lies just beyond a ravine. There is trouble on both sides of the fairway and all around the green. Paring this hole is an achievement in and of itself.
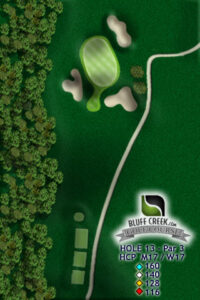
The green on this par 3 is higher than the tee. Club selection is key here based on wind and hole location. One of our larger greens on the course that slopes from back to front.
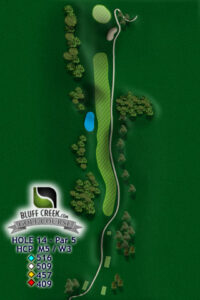
#14 is a longer Par 5. The Tee shot is elevated to a generous fairway. Your approach shot will be uphill to a large green. Birdie opportunity is probable with 3 solid shots.
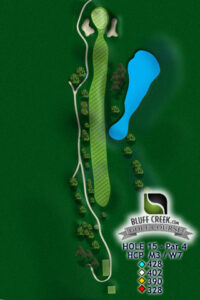
A narrow landing area with water on the right makes the drive placement critical. Trees guard the left side of the fairway that opens up the closer you get to the green. A bunker protects the left and our new collection area attracts many errand shots to the right.
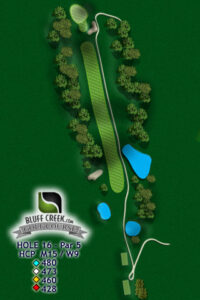
Another par 5 where eagles can happen. Water to the left and right off of the tee make it important that the drive is straight. The approach is to an elevated green with a bunker on the right.
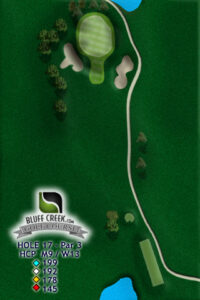
A long par 3. Playing close to 200 yards, this hole not only requires length but also accuracy. 2 bunkers flank the greens front. The greens is one of our largest, so even if you are on, you may have a lengthy putt.
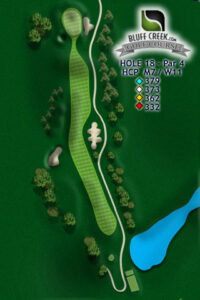
The finishing hole is a par 4 that doglegs slightly to the right. The landing area is wide, but for the big hitters who want to have a risk reward, driving over the fairway bunker will shorten the hole and give you a great approach. Drive it into the bunker, and it will require a good fairway bunker shot to save your par. The green is long and narrow with a bunker on the right and turf hollow on the left.